
How to Install BMW 5 Series Interior Ambient Light Strips: A Professional Guide
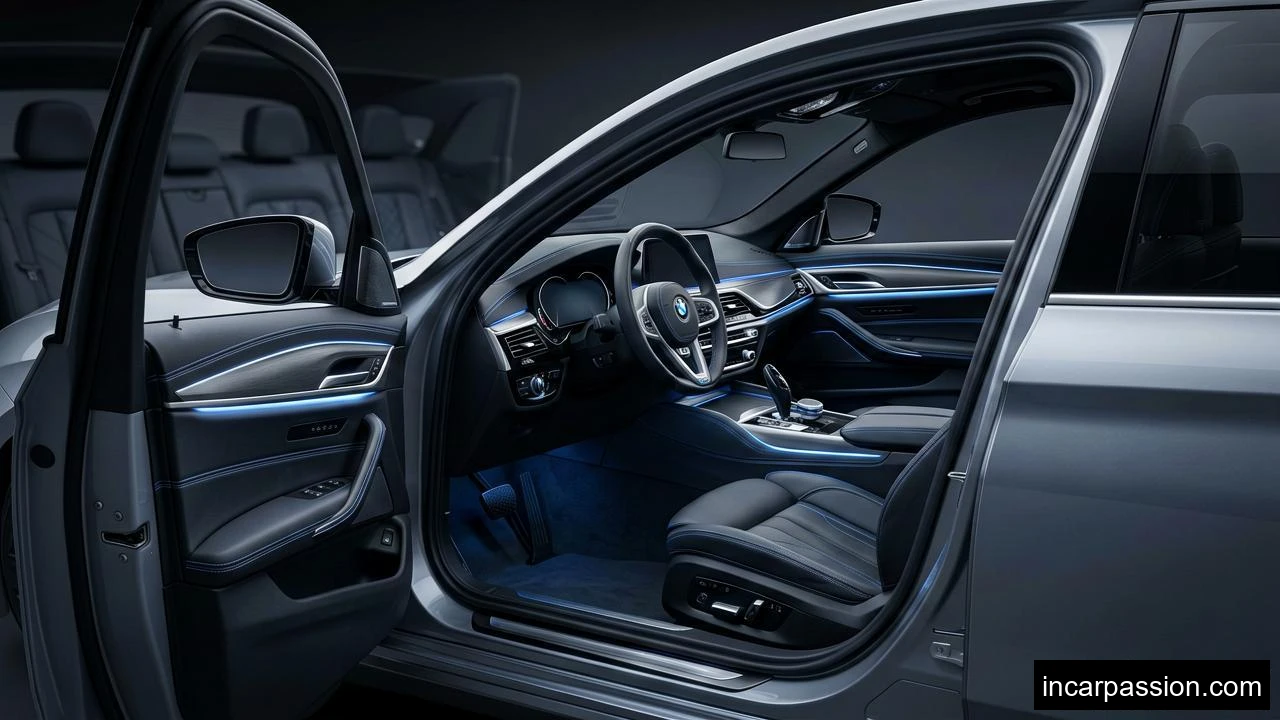
If you want a cleaner cabin look without paying dealer retrofit prices, installing BMW 5 Series ambient light strips is one of the more practical upgrades you can do at home. We manufacture these kits for importers and installers, and from what we’ve seen, the difference between a smooth install and a weekend full of swearing usually comes down to three things: picking the right strip type, planning wire routing before you peel any tape, and not wrecking BMW trim clips.
For most BMW 5 Series projects, a careful DIY installer can finish the main cabin in 3 to 6 hours. Material cost for a decent aftermarket kit is usually USD 85-220, while a workshop install often lands around USD 180-450 depending on whether the kit ties into factory door panels, dashboard trim, footwells, and iDrive color control.
If you’re still comparing options, our pages on [car ambient light](/), [interior car lights](/), [car led strip light](/), and [car lighting upgrade](/) give a broader view of kit styles and fitment choices.
Why BMW 5 Series ambient light installs can be tricky
Here’s the first thing a lot of buyers underestimate: BMW cabins look simple, but the trim geometry really isn’t. On the 5 Series, especially F10/F11 (2010-2017) and G30/G31 (2017-present), the gap between decorative trim and substrate can vary from 1.5 mm to 4 mm. That matters because most universal light guides are 3 mm, 5 mm, or 6 mm wide at the insertion edge.
If the strip is too thick, it’ll bow out or create pressure points. Too thin, and it can start rattling after 2 to 3 months in hot weather. In our factory tests, cabins that reach 65°C to 78°C under summer sun expose weak adhesive choices and oversized diffuser profiles pretty quickly.
That’s why we always tell buyers to dry-fit first and cut later. Sounds obvious, sure, but it prevents at least half the rework we see in returned sample feedback.
What you need before you start
Most BMW 5 Series ambient light kits include a controller, fiber or silicone diffuser strips, wiring harnesses, and a power module. A solid DIY tool set should include:
– Plastic trim removal tools, 4 to 6 pieces
– T20 and T25 Torx drivers
– Multimeter, DC 20V range
– 3M promoter or equivalent adhesion primer, 5-10 ml
– Microfiber cloths, 2 to 3
– Isopropyl alcohol, 70% to 99%
– Fabric tape for wire bundling, 15-20 mm width
– Zip ties, 100 mm to 150 mm
– Fuse tap if using accessory power
– Gloves to avoid fingerprints on piano black trim
A universal kit for a full 5-door cabin usually uses 8 to 14 light sections and total cable length of 8 m to 16 m.
Pick the right kit style first
Not every kit goes in the same way. Before you start opening trim, decide whether you’re using an insert-style strip, an adhesive surface strip, or a direct replacement trim kit.
Kit type Best for Typical width Material Typical price Insert light guide strip Tight trim gaps on dash and doors 3-5 mm PVC + fiber/silicone diffuser USD 85-160 Adhesive surface strip Fast DIY installs with minimal trim removal 8-12 mm Silicone tube with LED PCB USD 60-120 Replacement trim kit OEM-style finish and better integration Vehicle-specific ABS/PC trim + LED module USD 180-420 RGB app-controlled universal kit Budget customization 3-6 mm strip + controller PMMA fiber or silicone USD 90-220
For most DIY owners, the insert light guide style gives the best balance between appearance and labor. It sits deeper, hides the light source better, and when it’s installed properly, it looks much closer to OEM.
> Pro Tip
> On BMW door trims, test a 150 mm sample piece on the upper front edge first. If insertion force feels high enough to leave a visible trim wave, step down from 5 mm to 3 mm strip. We’ve seen this a lot on older F10 panels where the clips and substrate have stiffened with age.
Check your BMW 5 Series model before disassembly
This can save you a lot of trouble right away. BMW 5 Series trim layouts vary enough by generation that “universal” install videos often send DIY owners in the wrong direction.
BMW 5 Series generation Common install areas Typical DIY time Power source options F10 sedan Dash trim, 4 doors, footwells 4-6 hours Fuse box, ACC line, cigarette socket F11 touring Dash, 4 doors, rear side trim, footwells 5-7 hours Fuse box, ACC line G30 sedan Dash, 4 doors, center console, footwells 3-5 hours Fuse box, BCM-compatible controller G31 touring Dash, doors, console, rear side trim 4-6 hours Fuse box, ACC line, dedicated harness
If you’re still choosing hardware, browse related [automotive led lighting](/), [vehicle ambient light](/), and [auto ambient lighting](/) options to compare kit structures.
Step 1: Disconnect power and protect the interior
Before removing any trim, switch off the ignition and disconnect the negative battery terminal if you plan to tap power directly. On BMW 5 Series vehicles, especially newer G30 platforms, we prefer a full battery disconnect if there’s any chance a side trim panel is near an airbag routing path.
Lay microfiber cloth over:
– center console gloss surfaces
– iDrive controller area
– door sill trim
– gauge cluster hood
A scratched BMW trim panel can cost more than the light kit. Replacement decorative trim can run USD 90-280 per piece depending on finish.
Step 2: Map the lighting path before peeling tape
This is where the good installs start. Hold each strip against the trim line and decide:
– where each run starts and stops
– where wires will exit behind trim
– where the controller will sit
– how you will cross from dash to doors, if at all
For a clean look, we usually target visible light line lengths of:
– Dashboard: 850-1,100 mm
– Front doors: 650-900 mm each
– Rear doors: 500-780 mm each
– Center console sides: 350-600 mm
– Footwells: 2 LED pods or 300 mm strip per side
Don’t cut all strips at once. Cut one section, test-fit it, then move on to the next.
> Common Mistake
> Many DIY installers measure the decorative trim only, then forget the extra 30-80 mm needed for hidden routing behind the panel. That leads to short sections, connector strain, or visible splices near the corners.
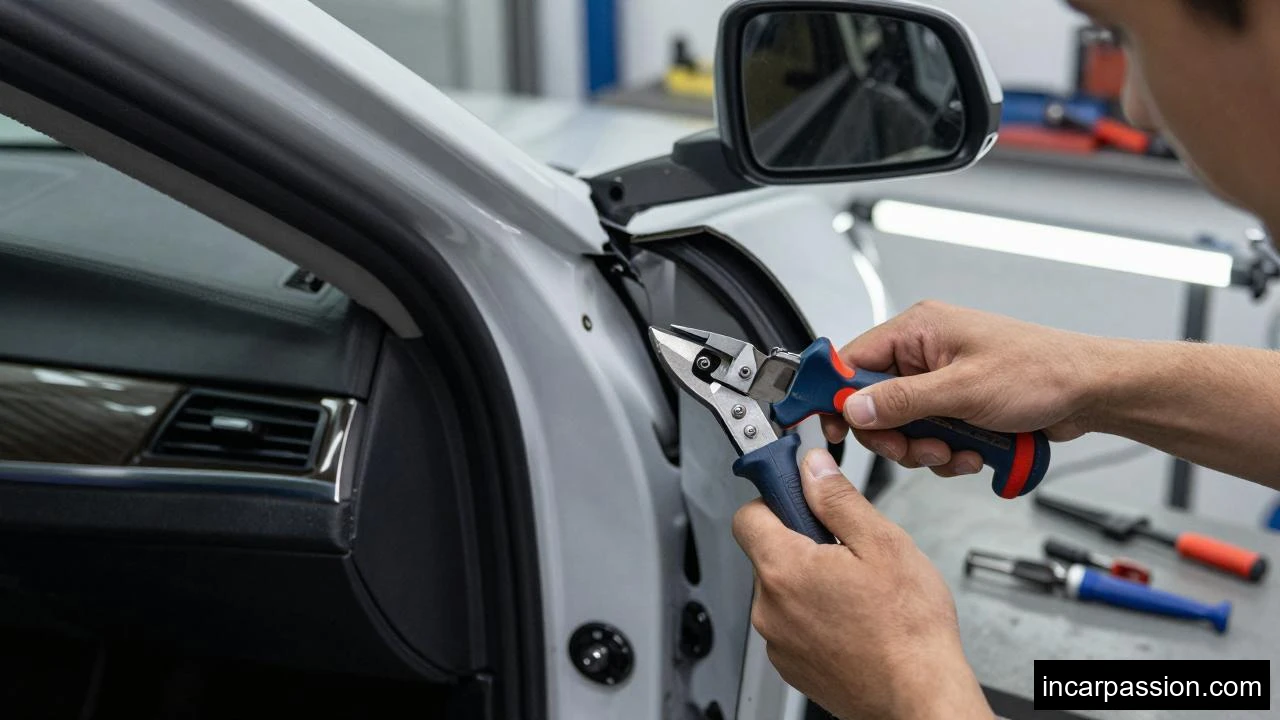
Step 3: Remove trim carefully
Use plastic tools only. On most BMW 5 Series dash trims, clip spacing is roughly 120-180 mm apart. Pry close to clip points, not from the center of a long trim piece. That cuts down the cracking risk.
For door trim:
1. Remove hidden screws if present, often behind handle covers.
2. Start from the lower edge.
3. Release clips one by one.
4. Lift upward if the panel hooks into the window line.
If a panel doesn’t release with moderate pressure, stop and check for another screw. Really. In our experience, forcing trim is the fastest way to break retaining tabs.
Step 4: Clean the surfaces properly
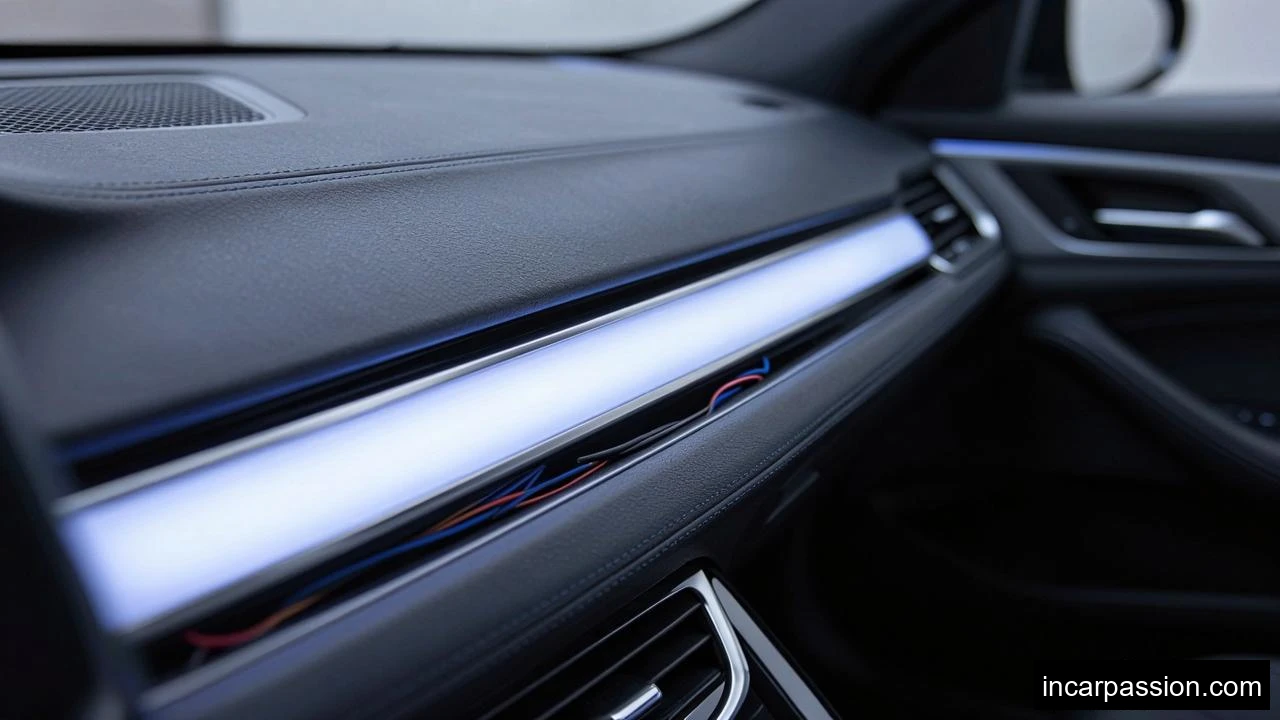
Even insert-style strips benefit from clean contact surfaces because the wire anchor points and controller mounts still rely on adhesive pads.
Wipe all contact areas with isopropyl alcohol and wait 2-3 minutes. If the surface is textured ABS or TPO, use a thin adhesion promoter on the tape area only. Let it flash off for 30-60 seconds.
Cheap kits often use generic foam tape rated for 50°C to 60°C. We recommend replacing it with automotive-grade acrylic tape if your region gets strong summer heat. The tape itself may add only USD 3-8 to the install, but it saves you from sagging later.
Step 5: Install the ambient light strips

For insert strips:
1. Start from the least visible end.
2. Feed the strip into the trim gap using thumb pressure.
3. Work in 50-100 mm sections.
4. Avoid stretching the diffuser during insertion.
5. At curves, compress slightly rather than pulling tight.
For adhesive strips:
1. Test the line with masking tape first.
2. Peel backing in short sections.
3. Press for 10-15 seconds every 100 mm.
4. Do not install below 15°C cabin temperature if possible.
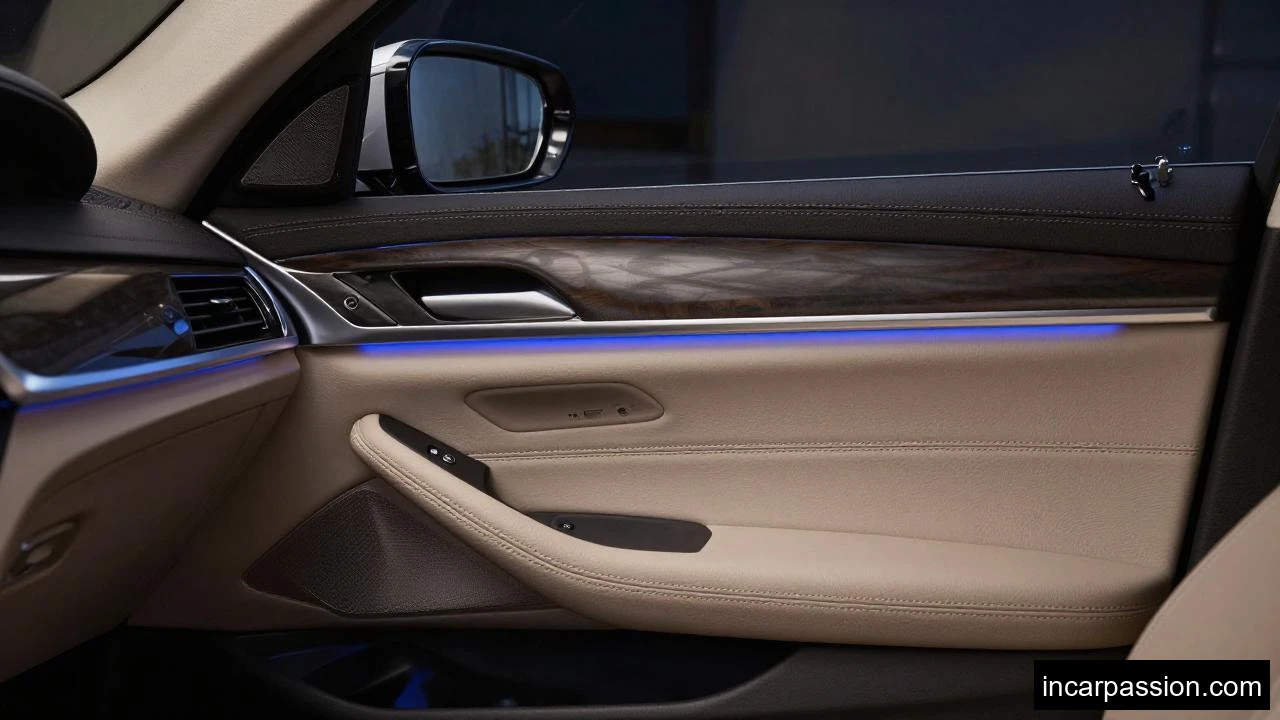
A neat BMW 5 Series ambient light result depends on line consistency. If one door sits 2 mm higher than the others, you’ll notice it right away at night.
> Engineering Note
> In our production builds, the most stable diffuser materials are usually co-extruded silicone + PC light guide or PMMA fiber with PVC jacket, depending on bend radius. For tight BMW door corners under R20-R25 mm, softer silicone diffusers reduce corner whitening and light leakage better than rigid acrylic profiles.
Step 6: Route wiring the way installers do
This is the step that separates a factory-looking cabin from a noisy one. Keep wires:
– away from window regulator tracks
– away from side airbag deployment paths
– tied every 150-250 mm
– wrapped in fabric tape where they may touch hard plastic
For door-to-body routing, the cleanest method is to follow the existing rubber boot path if your kit is designed for it. If not, many DIY owners leave each door as a separate local circuit powered by a door-safe source or a central controller with dedicated looms. The best method depends on your kit architecture.
Don’t pinch connectors behind a panel edge. A connector body thickness of 6-10 mm may not sound like much, but behind a tight BMW trim return it can print through and create a visible bulge.
Step 7: Connect power safely
Most aftermarket BMW 5 Series ambient light kits use one of three power methods:
– 12V ACC fuse tap: most common, stable, DIY-friendly
– Cigarette lighter/accessory source: easiest but less integrated
– Dedicated CAN/BCM-compatible harness: cleaner control, more complex
Use a multimeter and verify:
– constant 12V: around 12.2-12.8V engine off
– charging voltage: around 13.5-14.7V engine running
– ACC trigger behavior
For a standard cabin kit drawing 8W to 24W, current is usually well below 2A, but always check the controller rating. We normally spec a 3A to 5A inline fuse for universal kits.
If you want OEM-style color synchronization, that depends heavily on the vehicle generation and the controller protocol. Some G30-specific kits can interface more neatly than universal RGB kits, but compatibility varies by supplier and software version.
Step 8: Test everything before reassembly
Before snapping all panels back:
– power on the kit
– cycle every color
– test brightness from 10% to 100%
– check each connector
– open and close each door
– watch for flicker during engine start
If one section looks dimmer, common causes are:
– diffuser bent too tightly
– connector not fully seated
– polarity issue on a branch
– uneven insertion depth
– damaged strip from over-bending
A good test time is 10-15 minutes of continuous operation before final closure.
Step 9: Reassemble slowly
Reinstall trim in reverse order. Press near each clip location, not randomly across the panel. On BMW interiors, clip damage often comes from pushing on unsupported areas.
After reassembly, do a night check. This is where the small flaws show themselves:
– one light line too shallow
– tape reflecting off gloss trim
– wire shadow visible at strip start point
– color mismatch between dashboard and doors
Small details, yes. But they’re what decide whether the install looks like a USD 100 DIY kit or a USD 300+ professional retrofit.
How long should a good ambient light kit last?
With decent LEDs, proper heat management, and real automotive-grade tape, a quality kit should last 3 to 5 years in normal use. Better controllers and higher-bin LEDs can last longer. In our factory warranty data, the most common failures are not the LEDs themselves. They’re usually:
– weak connectors after repeated panel removal
– controller failure from voltage spikes
– adhesive lifting in high heat
– light leakage from badly cut strip ends
That’s why very cheap kits under USD 40 often create more work than value.
Is DIY worth it, or should you buy a vehicle-specific kit?
If you enjoy trim work and wiring, DIY makes sense. If you want OEM-level fit with less cutting, a vehicle-specific set is usually the better choice, even at a higher cost.
For buyers sourcing in bulk, our factory usually sees:
– Universal BMW-style kits MOQ: 50-100 sets
– Vehicle-specific trim kits MOQ: 20-50 sets
– Sample lead time: 5-10 days
– Mass production lead time: 20-35 days
If you’re a shop, importer, or brand building your own line of [car tuning parts](/), paying a bit more per unit often reduces after-sales claims enough to make it worthwhile.
FAQ
Will ambient light strips damage BMW interior trim?
Not if you use plastic trim tools, avoid metal prying, and choose the correct strip width. Damage usually happens when installers force 5-6 mm strips into gaps closer to 2-3 mm, or when hidden screws are missed during door panel removal.
Can I install BMW 5 Series ambient light without cutting wires?
Yes, many plug-and-play kits are designed to avoid cutting factory wiring. A fuse tap or dedicated harness is usually enough. We recommend avoiding Scotchlok-style quick taps because they are a frequent source of intermittent faults.
Which BMW 5 Series models are easiest for DIY installation?
In our experience, G30 sedan layouts are generally easier than older F10 door trim retrofits if you have a vehicle-specific kit. Universal kits can be easier on F10 dashboards but harder on aged door panels where clips and trim tolerance have changed over time.
Do ambient light strips drain the battery?
Not in normal use if connected to an ACC-switched source. A typical kit drawing 8W to 24W consumes about 0.7A to 2.0A at 12V. The problem comes when owners connect the kit to constant power and leave the controller active.
What color looks most OEM in a BMW 5 Series?
Amber, ice blue, and white are the most common OEM-style looks, depending on model year and trim theme. RGB kits are more flexible, but many owners settle on 6000K white or a low-saturation blue after the novelty wears off.
Can I add footwell and door handle lighting at the same time?
Yes. Many controllers support 6 to 12 outputs. Just make sure total load stays within the controller rating and fuse size. Footwell pods usually add only 1W to 3W each, so they are easy to integrate.
Final advice before you start
If this is your first BMW interior project, don’t try to finish the whole car in one rushed session. Start with the dashboard and one front door. That gives you a realistic sense of trim fit, wire routing, and strip width before you commit to the rear cabin.
The best BMW 5 Series ambient light install is not the one with the most colors. It’s the one with straight lines, hidden wires, stable power, and no rattles after 3 months of summer driving.
If you’re comparing kit structures, materials, or private-label options for your own brand, you can also browse our [car mood lighting](/) and [automotive interior lights](/) categories for related styles and upgrade paths.
References & Sources
1. BMW Owner’s Guide
2. 3M Automotive Attachment Tapes
3. OSRAM Automotive LED Lighting
 Audi
Audi BMW
BMW Mercedes Benz
 BYD
BYD BAIC MOTOR
 Denza
Denza Ford
Ford Geely/ZEEKR
 Honda
Honda Hyundai Kia
 Jaguar
 Jetour
 Jeep
Jeep Lamborghini
 Land Rover
 Lexus
Lexus Li Auto
 Mazda
Mazda Nissan
 Porsche
 Tesla
Tesla Toyota
 Volkswagen
 Volvo
Volvo