How to Install BMW 3 Series Ambient Lighting Kits: A Step-by-Step Professional Guide
Meta description: Learn how to install a BMW 3 Series ambient light kit with pro-level steps, exact tool sizes, wiring specs, fitment tips for F30/F35 and G20/G28, pricing, MOQ, and when to choose a shop install. Compare universal vs vehicle-specific kits and avoid common trim and wiring mistakes.
Thinking about adding a BMW 3 Series ambient light kit? The good news: this is absolutely a job you can do at home if you buy the right kit and treat the trim carefully. The bad news: BMW interior panels don’t forgive mistakes. One broken clip or one pinched fiber strip, and a 2-hour install can suddenly eat your whole weekend.
We build these kits in our factory for wholesalers, retrofit shops, and private-label buyers, and we notice the same thing over and over: the install itself usually isn’t the hardest part. What trips people up is choosing the right kit structure, routing the wiring neatly, and matching the kit to the exact 3 Series generation.
So here’s how we’d handle a BMW 3 Series install on the workshop floor, using real dimensions, tool sizes, common failure points, and the actual trade-offs between universal and vehicle-specific kits.
If you’re still deciding whether to DIY, buy a plug-and-play kit, or source in bulk for a retrofit business, this guide is designed to help you make that decision with less guesswork and fewer returns.
> Looking to upgrade your inventory or retrofit a fleet? If you are a distributor, shop owner, or private-label brand, choosing the correct kit architecture is critical to minimizing returns and maximizing customer satisfaction. Read on for our complete technical breakdown and sourcing recommendations.
—
Before You Start: Know Your BMW 3 Series Platform
This catches a lot of buyers early: “BMW 3 Series” is not one car when it comes to ambient lighting. An F30, a G20, and a long-wheelbase China version may all need different trim lengths, connectors, and controller logic.
From what we see, most 3 Series upgrades fall into one of these groups:
* F30/F35: roughly model years 2012-2019 (utilizes the Front Electronic Module or FEM for lighting control; typically features a 2-color classic amber/white OEM scheme).
* G20/G28: roughly model years 2019 onward (utilizes the Body Domain Controller or BDC; features multi-color LIN-bus integration controlled directly via the iDrive system).
* Touring (F31/G21) and regional variants may have different door-card structures and longer rear wiring runs.
That matters because BMW uses different interior trim geometry, dashboard molding depth, door card clip patterns, harness routing space, and in some cases different infotainment and body-control behaviors across generations. A sedan, wagon, or long-wheelbase version may also change the strip length you need for the dashboard or rear doors.
Typical Kit Configurations & Pricing
A typical full cabin kit includes:
* 4 door trim light strips
* 1 dashboard strip (often split into a short driver-side strip and a long passenger-side strip)
* 1 center console strip
* 4 footwell lamps
* 1 controller module (main ECU) + sub-modules for each door (to avoid routing wires through door bellows)
* 1 power harness
* Optional speaker surround rings
For a retail DIY kit, typical pricing looks like this:
| Kit Type | Typical Contents | Retail Price Range | Best For |
|---|---|---|---|
| Universal strip kit | 5-8 LED strips, basic controller, wiring | US$45-US$90 | Budget DIY |
| Semi-specific kit | Door + dash strips, harness, app/RF control | US$95-US$180 | Most home installers |
| Vehicle-specific molded kit | Pre-cut trims, OEM-style connectors, CAN integration | US$180-US$420 | Cleanest OEM-style result |
| Full shop retrofit package | Full cabin + speaker + footwell + coding support | US$350-US$800 | Professional installs |
If you want the result to look as factory as possible, a vehicle-specific molded BMW 3 Series ambient light kit is usually worth the extra money. In our factory, it’s also the version with the lowest return rate, mainly because the strip profile, connector direction, and trim depth are already matched.
If you’re still comparing styles, it helps to look through broader [car ambient light](/), [automotive interior lights](/), and [car lighting upgrade](/) options first so you can see where BMW kits fit in the market.
—
BMW 3 Series Generations, Fitment Differences, and Buyer Checklist
Before you buy, confirm these details:
* Exact chassis code: F30, F35, G20, or G28
* Model year
* Sedan, touring, or regional long-wheelbase variant
* Left-hand-drive (LHD) or right-hand-drive (RHD)
* Whether you want door trim only, dash + doors, or full cabin
* Whether you want RGB multicolor, single-color OEM-style, or app-controlled
* Whether you need speaker rings, footwell modules, or center console illumination
* Whether the kit uses adhesive strips, snap-in profiles, or replacement trim pieces
Typical Fitment Variables by Platform
| Platform | Rough Model Years | Common Install Notes | Buying Risk if Wrong |
|---|---|---|---|
| F30/F35 | 2012-2019 | More retrofit-friendly aftermarket availability; many kits use adhesive or fiber strips | Medium |
| G20/G28 | 2019 onward | More model-specific trim contours and higher expectation for OEM-like finish | High |
| Touring / regional variants | Varies | Door card, rear trim, and routing paths may differ | Medium to High |
If a seller cannot clearly state chassis compatibility, strip lengths, harness type, and whether the kit supports your body style, that is usually a warning sign.
BMW Entities and Fitment Details Worth Checking
To improve fitment accuracy, buyers should also look at related BMW entities and interior systems that may affect installation:
* iDrive trim layout (CIC, NBT, NBT Evo, or MGU/iDrive 7/8 systems)
* Door card architecture (Sensatec, Vernasca leather, or fabric inserts)
* Dashboard decorative molding (Hexagon aluminum, Ash Grain wood, or carbon fiber)
* Footwell lamp housing (OEM LED vs. halogen bulb housings)
* Speaker grille surround (Harman Kardon vs. HiFi/base audio grilles)
* Window switch panel connector placement (LIN-bus signal tap points)
* Body control module behavior (FEM on F-chassis, BDC on G-chassis)
* CAN-bus or decoder support (for controlling colors via the iDrive screen)
* LHD/RHD harness routing differences (main controller placement changes sides)
These details matter more on G20/G28 cars, where expectations for OEM-like integration are higher and trim geometry is often less forgiving than older F30/F35 interiors.
—
Technical Specifications & Material Science of Ambient Lighting
When sourcing or purchasing a kit, understanding the physical and electrical specifications prevents premature component failure.
Light Guide Material Comparison
| Material | Light Transmission Efficiency | Flexibility (Min Bend Radius) | Heat Resistance | Visual Hotspots |
|---|---|---|---|---|
| PMMA (Acrylic) | High (92%+) | 25 mm | Up to 85°C | Minimal (Uniform glow) |
| Polycarbonate (PC) | Medium (88%) | 35 mm | Up to 120°C | Low |
| Silicone / PVC Flex | Low (75-80%) | 15 mm | Up to 70°C | High (unless highly diffused) |
Key Electrical and Physical Specifications
* Input Voltage: 9V – 16V DC (12V nominal, designed to handle alternator charging spikes up to 14.4V).
* Rated Power: 8W to 25W for a full cabin kit (typically 1.5W to 3W per door module).
* Controller Standby Current: < 2.0 mA (crucial for preventing battery drain warnings on BMW's sensitive power management system).
* Visible Light Line Width: 3.0 mm to 6.0 mm.
* Mounting Edge Thickness: 1.2 mm to 1.8 mm (thicker edges will prevent the trim from snapping back into place).
* LED Density: 144 to 180 LEDs per meter for direct-lit strips, or high-output 3W RGBW diodes for fiber-optic light engines.
* Compliance Standards: Look for kits built to comply with SAE J1113 (electromagnetic compatibility) and ISO 16750-2 (environmental and electrical testing for road vehicles).
—
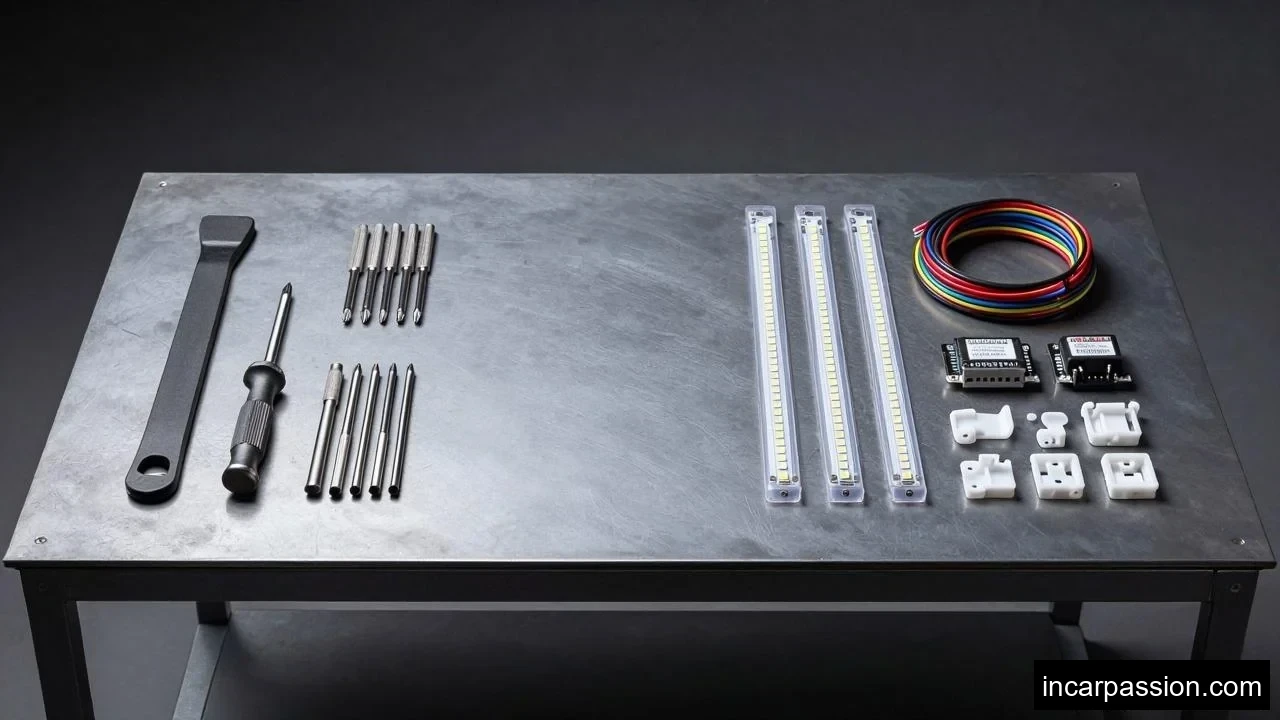
Tools and Materials You Actually Need
Don’t start this with a random screwdriver set and good vibes. The right tools save clips, trim, and honestly, your mood.
Basic Tool List
* Plastic pry tools, 3-5 pieces (different angles and wedge shapes)
* Torx drivers: T15, T20, T25 (BMW uses Torx screws almost exclusively for interior panels)
* Small ratchet with extension and 8mm / 10mm sockets
* Microfiber cloth (to protect trim from tool marks)
* Tesa tape (cloth harness tape) for OEM-style wire wrapping and rattle prevention
* Zip ties, 100-150 mm
* Digital Multimeter (DMM) to verify 12V switched power and ground
* Isopropyl alcohol, 70%+ (for surface prep)
* Panel clip organizer tray
* Optional heat gun on low setting, around 60-80°C for softening tape-backed strips
Materials Check
Before installation, lay out the whole kit and measure everything:
* Door strip length: usually 650-900 mm
* Dashboard strip length: usually 700-1,200 mm
* Wire lead length from each strip: ideally 300-500 mm
* Controller box size: must be under 70 x 45 x 18 mm to fit behind the dashboard or center console trim
* Power lead gauge: typically 22-24 AWG for signal, 20-22 AWG for low-current power
> Pro Tip
> On BMW 3 Series doors, we usually prefer a strip thickness of 1.2-1.8 mm at the visible edge. Once you go thicker than 2.0 mm, panel re-fit gets worse and the gap starts to look obviously aftermarket.
—
Universal vs Vehicle-Specific Kits: What Changes During Installation?
This is where a lot of DIY buyers make the wrong choice. Universal kits look cheaper on the listing page, but they usually cost you more time once you’re actually working on the car.
| Factor | Universal Kit | Vehicle-Specific BMW Kit | What We See in Production |
|---|---|---|---|
| Install time | 4-7 hours | 2-4 hours | Specific kits reduce routing errors |
| Trim cutting | Often required | Rarely required | Cutting raises reject risk |
| Wiring complexity | Higher (requires splicing) | Lower (plug-and-play harnesses) | More splicing with universal kits |
| Final appearance | Depends on installer | More OEM-like | Specific profiles fit BMW gaps better |
If you’re ordering for a shop or organizing a group buy, MOQ matters too. In our factory, a private-label universal set may start at 100 sets, while a custom molded BMW platform kit usually starts around 50-100 sets, depending on tooling status and packaging.
For readers comparing general [car led strip light](/), [auto ambient lighting](/), or [car interior led](/) products, the practical takeaway is simple: BMW-specific kits save labor and reduce the chances of trim damage.
—
Universal vs BMW-Specific Ambient Light Kits: Detailed Comparison Table
Here is the more practical buyer-side comparison most people actually need before ordering:
| Buying Criteria | Universal Strip Kit | Semi-Specific Kit | Vehicle-Specific Molded Kit | Shop Retrofit Package |
|---|---|---|---|---|
| Typical retail spend | US$45-US$90 | US$95-US$180 | US$180-US$420 | US$350-US$800 |
| Typical install time | 4-7 hours | 3-5 hours | 2-4.5 hours | Buyer time near zero |
| Trim damage risk | Highest | Moderate | Lowest | Lowest if installer is skilled |
| Wiring skill needed | Medium to High | Medium | Low to Medium | Low for buyer |
| Best match for F30/F35 | Good if budget-driven | Very good | Excellent | Excellent |
| Best match for G20/G28 | Riskier | Good | Best | Best |
| OEM-style finish | Limited | Good | Best | Best if using molded kit |
| Rework likelihood | Highest | Medium | Lowest | Depends on shop quality |
| Bulk MOQ suitability | Common at 100 sets | Common | Common at 50-100 sets | Not a bulk format |
| Best buyer profile | Hobbyist | Serious DIY | Premium DIY or reseller | Risk-averse owner |
Quick Decision Framework
1. Choose a universal kit if:
* Your budget is strictly under US$90.
* You accept a longer install time and potential panel modifications.
* You are comfortable trimming, test-fitting, and splicing wires.
2. Choose a semi-specific kit if:
* You want a manageable home install on an F30.
* You want dash + door coverage without fully custom trim pieces.
* You want reasonable cost with acceptable fitment risk.
3. Choose a vehicle-specific molded kit if:
* You want the closest OEM-style result (especially on G20/G28).
* You want lower trim damage risk and plug-and-play wiring.
* You are buying for resale, a customer car, or a premium personal build.
—
OEM-Style vs Aftermarket RGB Ambient Lighting
Many buyers are really choosing between two visual outcomes:
* OEM-style subtle ambient lighting: Thinner visible edge, softer diffusion, stable white, amber, blue, or factory-like tones, and less obvious controller hardware.
* Aftermarket RGB mood lighting with app control: Color chasing or scene modes, app control via Bluetooth, more zones, and stronger saturation.
Color Style Comparison
| Style Goal | Recommended Kit Type | Best Features to Prioritize | Main Risk |
|---|---|---|---|
| OEM-style luxury look | Vehicle-specific molded kit | Thin edge, soft diffusion, hidden wiring | Paying more upfront |
| Balanced daily-driver upgrade | Semi-specific kit | Clean fitment, stable controller, moderate cost | Some fitment variation |
| Show-car RGB effect | Universal or semi-specific RGB kit | App control, bright output, extra zones | More visible aftermarket look |
—
Step 1: Disconnect the Battery
This part is not optional.
BMW interiors often have side airbag wiring in the door area, along with sensitive electronics around the iDrive, window switch panels, and body control circuits. Disconnect the negative battery terminal and wait 10-15 minutes before unplugging major trim harnesses.
Why we’re strict about this:
* It reduces the risk of airbag fault codes.
* It prevents shorting low-voltage lighting circuits.
* It protects the controller module during first connection.
> Engineering Note
> Most retrofit ambient lighting kits run on 12V DC and pull only 8-25W for a full cabin set. So yes, power draw is low. But BMW fault monitoring can still react badly to poor grounding or unstable trigger wires. Good kits use a regulated controller with output ripple below 5%.
This aligns with basic vehicle electrical safety principles and owner guidance around battery disconnection and sensitive electronic systems. See the BMW Owner’s Guides and general safety resources from NHTSA before working around vehicle trim and wiring.
—
Step 2: Remove Door Panels and Dashboard Trim Carefully
Here’s where most damage happens: the first 20 minutes.
Trim and Panel Risk Checklist by Area
| Area | Typical Risk | What to Watch For | Prevention |
|---|---|---|---|
| Front door card | Broken upper tabs or clips | Pulling outward too early | Lift upward after releasing clips |
| Dashboard decorative trim | Scratches on piano black or metallic finish | Metal tool contact | Use microfiber-wrapped plastic tools |
| Center console trim | Misaligned refit or squeaks | Pinched wire or stressed tabs | Keep wire paths clear of clip holes |
| Rear door trim | Tight routing space | Excess slack near clips | Secure every 100-150 mm |
Step-by-Step Removal Sequence
1. Remove decorative trim covers: Use a wide plastic wedge tool to pop off the door handle trim cover, exposing the hidden Torx screws.
2. Remove Torx screws: Typically, there are two T20 screws behind the door handle pull and one or two along the bottom edge of the door card.
3. Pry the door card: Start from the bottom outer corner. Insert your plastic pry tool and pop the door clips (usually 8-10 clips per door).
4. Lift panel upward: Once all clips are popped, lift the panel straight up to clear the lock pin. Do not pull straight out.
5. Disconnect harnesses: Unplug the door latch cable, window switch connector, and courtesy light harness.
6. Remove dashboard trim: Start from the passenger-side trim edge. Pry evenly across the decorative panel to release the metal retention clips. Disconnect any light or hazard switch harness before fully removing.
> Common Mistake
> Pulling the panel outward before lifting it upward. On many 3 Series door cards, this snaps the upper locating tabs. The panel may still reinstall, but it will sit loose near the window seal and vibrate at 40-60 km/h.
—
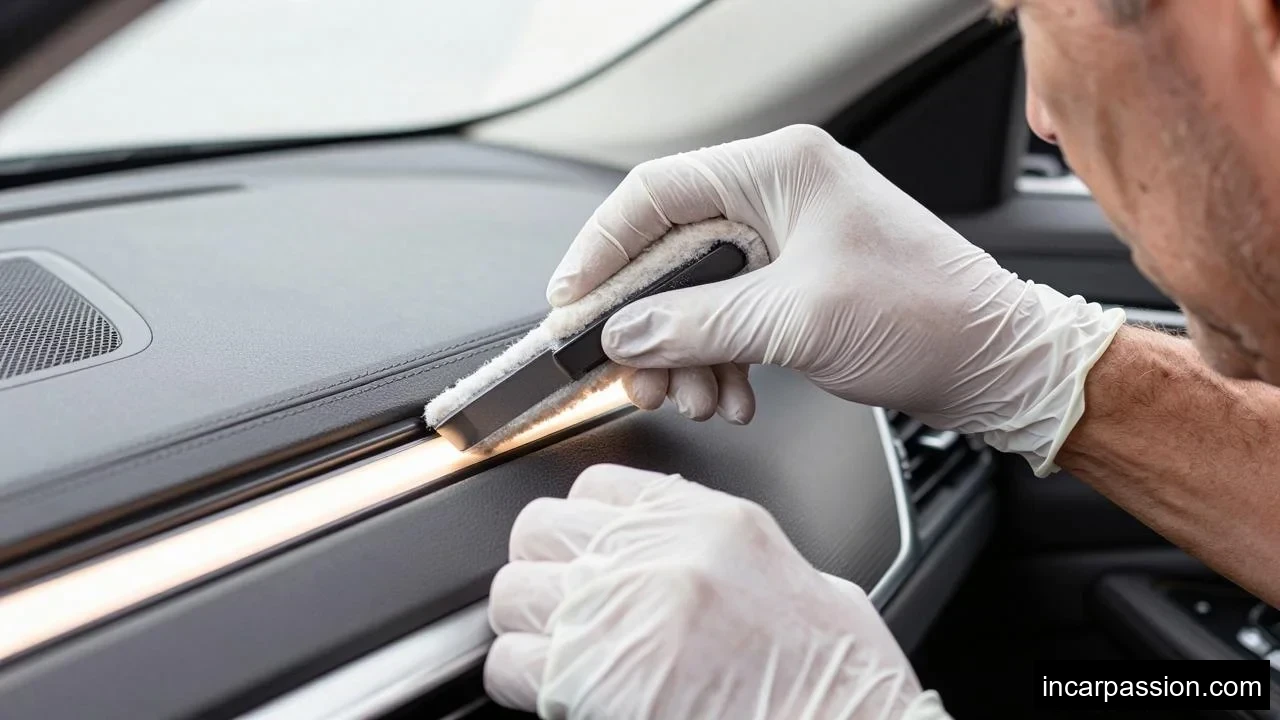
Step 3: Test-Fit the Light Strips Before Any Adhesive or Locking
Never peel the adhesive backing right away. Dry-fit first. Always.
Check these points:
* Does the strip sit flush in the OEM trim gap?
* Is the emitted light line continuous?
* Does the strip bend evenly around corners?
* Does the wire exit in a hidden direction?
* Does panel reinstallation still close fully?
In our workshop, we allow a maximum visible gap of about 0.5 mm along the trim edge. More than that, and the strip starts looking “stuck on” instead of integrated.
If the kit uses acrylic light guides or fiber optic rods, stay away from tight bends. A safe bend radius is usually 25-35 mm minimum. Tighter curves can create dark spots or stress whitening after 3-6 months of heat cycling.
—
Step 4: Mount the Door and Dashboard Light Strips
Clean all mounting surfaces with isopropyl alcohol and let them dry for 2-3 minutes.
Then:
1. Start from the most visible edge.
2. Seat the strip in short sections of 80-120 mm.
3. Press evenly with your thumb or a wrapped trim tool.
4. Secure loose wire exits with cloth tape.
5. Avoid crossing screw bosses or clip towers.
For adhesive-backed kits, apply pressure for at least 20-30 seconds per section. If the workshop temperature is below 18°C, warm the area a little. Cold plastic is one of the main reasons tape-backed kits fail in winter.
Some BMW kits use snap-in profiles instead of adhesive. We prefer those when the tooling is right because they age better, especially in places where cabin temperatures can reach 70°C in direct sun.
If you’re also looking at broader [car led lights](/), [vehicle ambient light](/), or [car mood lighting](/) upgrades, the mounting logic is the same: fit first, route second, lock it down last.
—
Step 5: Route the Wiring Like a Professional
This is where a clean install starts to separate itself from a noisy one.
Door Routing Rules
* Follow the OEM harness path whenever possible.
* Leave 30-50 mm slack at moving joints (door hinges).
* Keep wires away from window regulator paths (roll the window down to check clearance before securing).
* Secure every 100-150 mm using zip ties or Tesa tape.
* Never place wires where door clips must re-seat.
Dashboard and Console Routing Rules
* Avoid HVAC flaps and moving linkages.
* Keep wiring away from sharp stamped metal edges.
* Bundle excess wire behind fixed cavities, not free-floating areas.
* Use cloth tape instead of PVC tape in cabin areas to reduce buzz.
Best Practices for BMW-Style Harness Routing
For a cleaner BMW ambient light retrofit, try to match OEM harness behavior:
* Use cloth harness tape instead of glossy PVC tape in visible cabin zones.
* Avoid crossing the path of window glass, door latch cables, or regulator arms.
* Keep connectors accessible for future service.
* Protect any pass-through point that touches a sharp edge.
* Avoid unsupported module placement behind thin decorative trim.
* Mount the controller where it will not buzz against hard plastic.
—
Step 6: Connect Power and Control Wires
Power method depends on the kit:
* Fuse tap into an ACC or interior lighting circuit.
* Plug-and-play harness using OEM-style inline connectors.
* CAN or decoder box for synchronized control.
* USB-powered mini kits for decorative footwell-only installs.
Power Method Comparison
| Power Method | Install Difficulty | Reliability | OEM Friendliness | Notes |
|---|---|---|---|---|
| Fuse tap | Medium | Good if done correctly | Medium | Good for DIY if |
Related Products
– ultimate guide to bmw 3 series ambient lighting
– bmw 3 series oem ambient light upgrades
– bmw 3 series ambient light upgrade guide
 Audi
Audi BMW
BMW Mercedes Benz
 BYD
BYD BAIC MOTOR
 Denza
Denza Ford
Ford Geely/ZEEKR
 Honda
Honda Hyundai Kia
 Jaguar
 Jetour
 Jeep
Jeep Lamborghini
 Land Rover
 Lexus
Lexus Li Auto
 Mazda
Mazda Nissan
 Porsche
 Tesla
Tesla Toyota
 Volkswagen
 Volvo
Volvo