The Ultimate Guide
to BMW 3 Series Ambient Light Upgrades: OEM Quality Explained
If you’re sourcing a BMW 3 Series ambient light upgrade program, the hard part isn’t getting light to switch on. That’s easy. The hard part is making it look OEM, fit consistently across model years, survive summer heat, and meet customer expectations for color consistency, installation time, and warranty return rate.
We work on these kits from the factory side, and honestly, buyers tend to ask the same thing first: “Can you match the original BMW look?” The real answer is: sometimes yes, sometimes close, and it depends on the generation, trim, and how much of the original door/dashboard architecture you want to keep.
A cheap universal strip can sell. But it usually won’t satisfy a distributor or installer who needs stable quality at scale. In B2B sourcing, the difference between a $58 kit and a $138 kit usually isn’t packaging or branding. It’s material grade, tool accuracy, connector design, diffuser optics, and how much vehicle-specific engineering has already been done before the goods leave the factory.
Why BMW 3 Series ambient light upgrades are a high-demand B2B category
The BMW 3 Series has one of the biggest aftermarket interior-upgrade audiences because it sits in a very useful middle ground:
– vehicle owners are willing to spend on appearance upgrades
– installers know the platform well
– many trims were sold with limited ambient light from factory
– buyers want “higher trim” interior feel without changing the whole dashboard
For distributors, that means strong fast-moving SKU potential. For workshops, it means installation labor is fairly predictable. For wholesalers, one keyword can cover multiple generations: E90, F30, and G20, with F30 and G20 creating the strongest demand in our order books.
According to BMW model information, the 3 Series is one of the brand’s core global passenger-car lines, and the current G20/G21 generation continues to anchor BMW’s volume sedan/wagon offer in many markets. That matters commercially: large parc size and long aftermarket lifespan usually support better repeat demand for appearance-upgrade accessories than niche BMW platforms do. BMW’s official model pages and BMW Group reporting are useful starting points for validating platform relevance before committing to tooling or stock depth.
Here’s the first thing we tell buyers: the BMW 3 Series market is not one product, but at least three product architectures. Mix them together and you’ll end up sourcing the wrong kit.
Which BMW 3 Series generations matter most for ambient light upgrades
See our guide on BMW G60/G68 2024+ Crystal Center Console Ambient Light Installation Guide for more details.
See our guide on DIY BMW Sky Lounge Roof Ambient Lighting Kit Installation! for more details.
From factory development work and buyer inquiries, these are the main demand groups:
– E90/E92/E93 (approx. 2005-2013): mostly retrofit demand, more wire-based solutions, more manual fitting
– F30/F31/F34 (approx. 2012-2019): strongest aftermarket retrofit volume, best balance of demand and installability
– G20/G28 (approx. 2019+): stronger OEM-look expectation, more digital integration requests, tighter fit tolerance demands
In practical sourcing terms:
– F30 kits usually perform best in volume because the customer base is large and the visual upgrade is dramatic
– G20 kits usually offer better margin, but buyers are far less forgiving about quality issues
– E90 kits are more price sensitive and rely more on installer skill
If you’re building a product line, we usually suggest starting with F30/F31 before expanding into G20.
Quick generation buying view
| Generation | Typical customer expectation | Fitment difficulty | Recommended product type | Commercial note |
|---|---|---|---|---|
| E90/E92/E93 | Affordable visual upgrade | Medium to high | Semi-vehicle-specific retrofit | Price sensitive; installer skill matters |
| F30/F31/F34 | OEM-style look at reasonable cost | Medium | Semi-specific or replacement trim kit | Best first platform for many B2B buyers |
| G20/G28 | High visual integration and clean control logic | High | Replacement trim integrated kit | Higher margin, but tighter tolerance for defects |
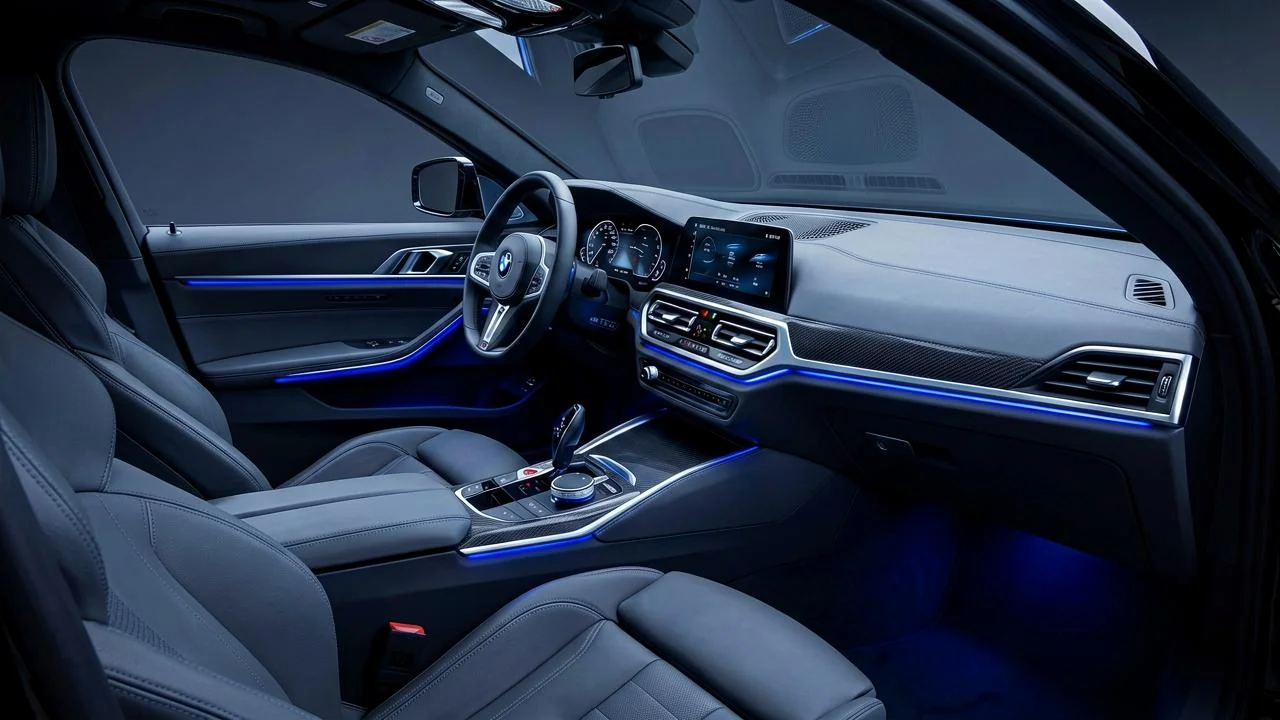
What “OEM quality” really means in ambient lighting
This is where a lot of suppliers get fuzzy. We’d rather define it with checkpoints. For a BMW 3 Series ambient light upgrade, OEM-quality should include these six things:
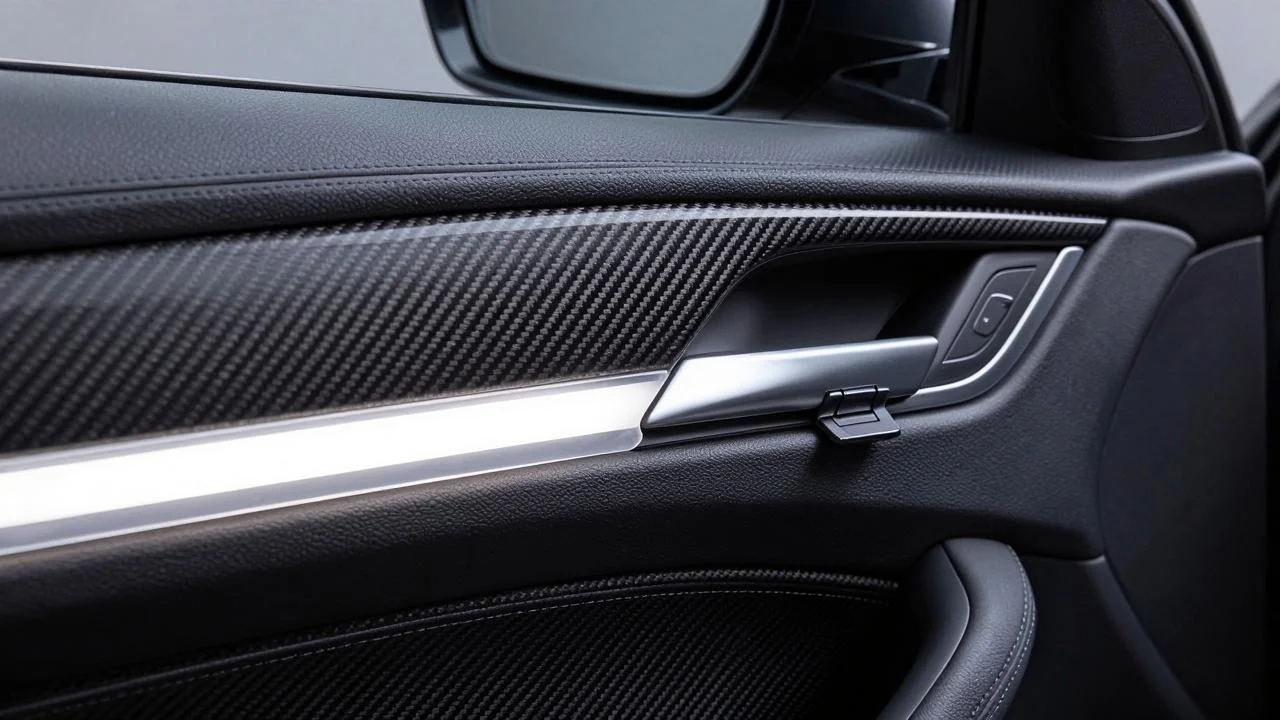
1. Vehicle-specific fitment
– trim pieces aligned to original panel geometry
– target gap control within ±0.5 mm to ±1.0 mm
– clip and mounting locations matching actual vehicle structure where possible
2. Uniform light output
– no visible LED hotspots at normal eye distance of 400-700 mm
– diffuser transmittance and optical pattern designed for line uniformity
– brightness variation ideally within 10-15% across one full trim piece
3. Stable color consistency
– LED binning controlled within a defined MacAdam step or practical visual consistency range
– in production, we usually reject mixed batches when blue or cyan shift is visible side-by-side
4. Heat and aging resistance
– PMMA or optical-grade PC diffuser
– ABS/PC or PC-ABS structural parts
– 3M-grade adhesive where tape is used
– validation under 70°C to 85°C cabin heat exposure
5. Electrical reliability
– regulated driver board
– reverse-polarity protection where required
– stable CAN-related behavior if integrated with vehicle systems
– connector insertion cycle target of 20-50 cycles depending on design
6. Install repeatability
– clear harness routing
– minimized cutting
– defined install time, ideally 2.5-4.5 hours for an experienced technician on a full kit
Second hook: if a supplier can’t define OEM quality with measurable points like these, they’re probably selling generic decorative lighting, not a serious vehicle-specific program.
Why these checkpoints matter technically
Authoritative automotive references support this kind of checklist-based evaluation. SAE standards are widely used across automotive engineering for connectors, materials, electrical performance, and environmental durability. UNECE vehicle regulations do not certify every aftermarket interior-light product directly, but they frame the wider safety and vehicle-system environment buyers operate in, especially where wiring, EMC behavior, and interior installation safety are concerned. Adhesive and material selection also matter in high-cabin-temperature environments; 3M’s automotive attachment guidance and tape product documentation are often useful when verifying whether a claimed “automotive tape” is actually suitable for plastic trim bonding.
Main product architectures for BMW 3 Series ambient light upgrade kits
There are three common kit structures in the market.
1. Universal LED strip kits
These use flexible strip, fiber optic line, or slim silicone diffuser inserted into panel gaps.
Typical ex-factory price: $18-$42/set
MOQ: 100-300 sets
Best for: entry-level e-commerce, price-sensitive markets
Weak point: inconsistent OEM appearance
Pros:
– lowest tooling cost
– broad compatibility
– easy branding
Cons:
– fit depends heavily on installer
– more hotspot risk
– adhesive failure rate higher in hot climates
– weak premium perception
2. Semi-vehicle-specific retrofit kits
These combine shaped light guides, model-focused harnesses, and some universal install components.
Typical ex-factory price: $55-$95/set
MOQ: 50-100 sets
Best for: distributors, installers, regional brands
Weak point: fit may still vary by trim and dashboard version
Pros:
– better light uniformity
– lower development cost than hard-trim replacement
– manageable install complexity
Cons:
– some cutting or panel modification may still be needed
– not all trims covered equally well
3. Full vehicle-specific replacement trim kits
These replace original decorative trim or integrate directly into molded parts.
Typical ex-factory price: $110-$220/set
MOQ: 30-80 sets for standard models, 200-500 sets for custom private mold development
Best for: premium distributors, conversion specialists, branded programs
Weak point: higher tooling and inventory complexity
Pros:
– closest OEM appearance
– repeatable installation
– stronger premium pricing
Cons:
– more SKUs for left-hand drive/right-hand drive, trim colors, model years
– higher return loss if fitment data is wrong
Comparison: universal vs vehicle-specific solutions
| Solution type | Typical ex-factory price | Install time | OEM look score* | Typical MOQ |
|---|---|---|---|---|
| Universal strip/fiber kit | $18-$42 | 3-6 hrs | 4/10 | 100-300 |
| Semi-vehicle-specific kit | $55-$95 | 2.5-4.5 hrs | 7/10 | 50-100 |
| Replacement trim integrated kit | $110-$220 | 2-4 hrs | 9/10 | 30-80 |
| Private-mold premium program | $160-$280 | 2-4 hrs | 9.5/10 | 200-500 |
\*Our internal practical scoring based on fit, uniformity, and visual integration, not an industry standard.
Decision framework: which architecture should you buy?
- Choose universal if your market is price-led, DIY-heavy, and accepts an aftermarket look.
- Choose semi-vehicle-specific if you sell through installers and need a better labor/result balance.
- Choose replacement trim integrated if your customers expect OEM-style appearance and are willing to pay for it.
Buyer comparison criteria that matter most
When comparing quotes, do not stop at unit price. Compare:
1. Fitment depth: exact year/body/trim coverage
2. Material stack: PC-ABS vs ABS, PMMA vs generic acrylic
3. Optical performance: hotspots, bend uniformity, brightness stability
4. Control strategy: remote, app, CAN, or iDrive-style behavior
5. Install burden: labor hours, cutting, routing complexity
6. Return exposure: trim mismatch, adhesive lift, color variation
7. Reorder stability: whether the factory controls molds, harnesses, and bins directly
Materials that separate good kits from problematic kits
This is where warranty rates are won or lost.
For visible light lines, we usually see these materials:
– PMMA light guide: excellent clarity and light transmission, but can crack if clip stress is too high
– Optical PC diffuser: better heat resistance, slightly different diffusion behavior
– Silicone sleeve diffuser: flexible and easy to install, but it gives less of that “hard OEM trim” appearance
– ABS substrate: common and cost-effective, but not enough by itself in hot areas
– PC-ABS blend: better heat and dimensional stability for replacement trim parts
For BMW interiors—especially dark dashboards that get hot in the sun—we generally prefer:
– PC-ABS structural trim
– PMMA or optical PC light guide
– 3M 9080/9448-class adhesive or equivalent proven automotive-grade tape, depending on surface energy and load
A cheap kit usually fails at the tape, not the LED. We’ve seen returns where the lighting still worked electrically after 12 months, but the line started lifting at the dashboard corner after 3-4 months in regions where parked cabin temperature reached 75°C.
> Pro Tip
> When comparing suppliers, ask for the exact resin grade for the trim substrate and diffuser, not just “ABS” or “acrylic.” We usually provide material callouts such as PC-ABS FR grade for structure and optical PMMA for light guide. That one line tells you a lot about whether the supplier is engineering the product or just assembling parts.
External material references buyers should check
Material makers publish useful baseline data. For example:
– Covestro and SABIC provide PC and PC-ABS data sheets covering heat resistance, impact performance, and dimensional stability.
– 3M publishes technical data for attachment tapes such as the 9080 and 9448 families.
– UL Solutions reference material and component-recognition systems that many buyers use as a secondary screen when checking plastics, wiring, and flammability-related documentation.
These sources will not tell you whether a BMW trim kit fits well, but they help validate whether the supplier’s claimed material stack is technically credible.
The most common lighting technologies used
Ambient light kits for BMW 3 Series usually use one of these:
– SMD LED + diffuser light guide
– Side-glow fiber with LED engine
– Mini PCB linear modules in molded channel
– RGB/RGBW digital control systems
For B2B, the safest balance is usually SMD LED with shaped diffuser/light guide, because it offers:
– good brightness control
– easier color consistency management
– more stable supply chain
– lower service complexity than some digital addressable systems
For premium trims, RGBW can provide a cleaner white and richer mixed colors than simple RGB. But it costs more, typically 12-22% above standard RGB for a complete kit depending on channel count and controller architecture.
Third hook: if your customer says they want “64 colors,” ask whether they actually need 64 distinct user selections or just a multicolor app controller. Those aren’t the same sourcing requirement.
RGB vs RGBW: practical buying choice
| Technology | Typical use case | Cost impact | White quality | Service complexity | Recommendation |
|---|---|---|---|---|---|
| RGB | Most retrofit kits | Baseline | Mixed white only | Lower | Best for mid-tier |
| RGBW | Premium OEM-look kits | +12-22% | Better dedicated white | Medium | Best for premium channels |
| Addressable digital RGB | App-heavy custom scene products | Variable | Depends on design | Higher | Use only if market truly demands effects |
OEM-style control options: basic, app, CAN, iDrive-linked
A BMW 3 Series ambient light upgrade can be controlled in several ways:
Basic manual controller
– inline button or RF remote
– lowest cost
– suitable for universal or retrofit kits
Cost impact: baseline
Bluetooth app controller
– smartphone color selection
– scene modes
– easier retail marketing
Cost impact: typically +$6 to +$12/set
CAN-bus linked controller
– reads door, ACC, dimming, or other status
– more OEM-style functionality
– more validation needed
Cost impact: typically +$18 to +$35/set
iDrive-style integration or factory-menu style behavior
This is the most requested option—and probably the most misunderstood. True integration depends on:
– vehicle generation
– existing body control architecture
– whether original ambient channels exist
– coding requirements
– local installer capability
Some products marketed as “original car sync” are really just power-state sync plus color memory. That may be enough for the market, but it isn’t full OEM electronic integration.
> Engineering Note
> On G20 projects, electronic integration claims need careful validation. We do not approve “plug and play OEM sync” language until we have tested on the exact BCM/head unit combination. One platform can have multiple software and hardware variants by region and production date.
Control selection by buyer type
- E-commerce/DIY: basic manual or app control
- Installer network: app control or memory-sync
- Premium distributor: CAN-linked or validated OEM-style behavior
- Dealer-style premium program: only claim full integration after exact vehicle testing
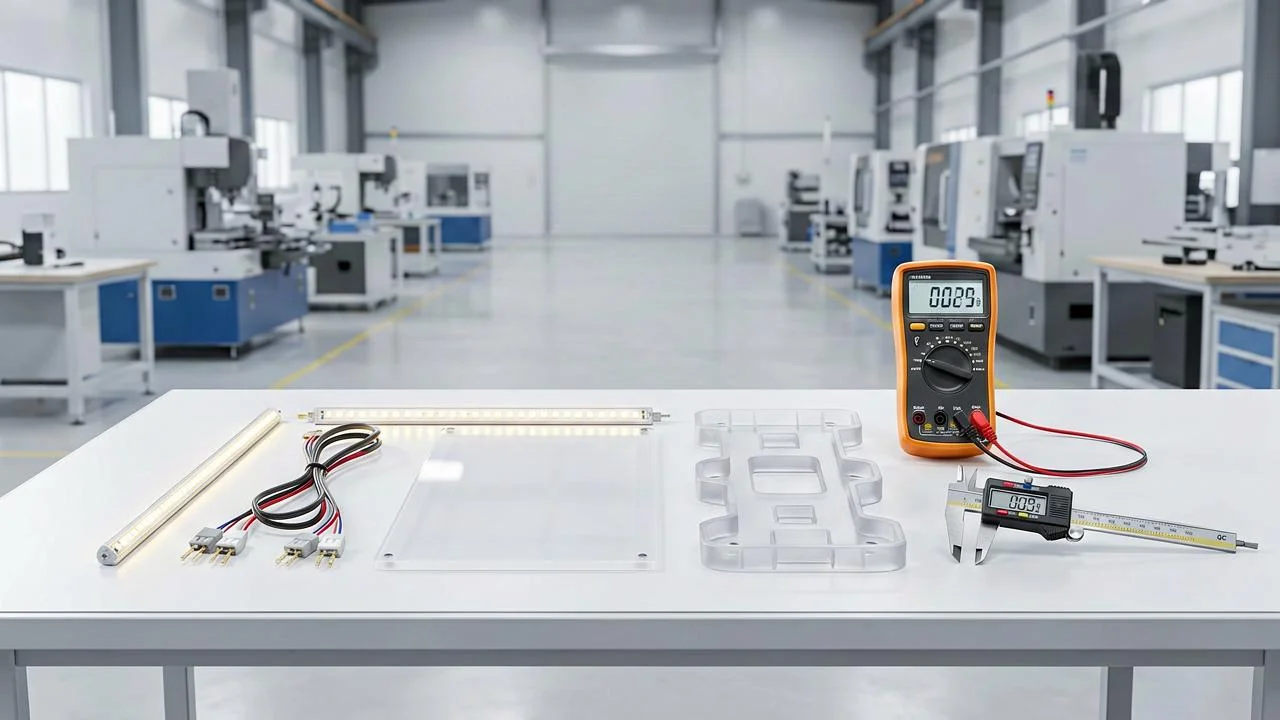
Product development workflow for a serious BMW 3 Series program
Buyers often ask why one factory needs 25-35 days to sample while another promises 7 days. Usually, it comes down to whether they’re doing real vehicle validation.
Our typical workflow looks like this:
1. Vehicle data confirmation
– exact model code
– year range
– LHD/RHD
– trim level
– existing ambient light or no ambient light
2. 3D scan or benchmark part review
– dashboard trim
– door trim
– center console
– footwell positions
3. Optical design
– LED spacing
– diffuser geometry
– hotspot control
– brightness target, often 8-20 lux at specific viewing angles depending on position
4. Electrical design
– input voltage range usually 9-16V
– overcurrent protection
– controller communication logic
5. Prototype build
– 3D print or CNC sample trim
– hand-built harness
– first light test
6. Vehicle fit test
– insertion force
– clip retention
– interference with airbags, switches, panel joints
7. Pilot run
– often 20-50 sets
– packaging validation
– installation instruction check
8. Mass production
– incoming LED bin inspection
– harness continuity test
– illumination check
– aging or burn-in test, often 2-8 hours
Fourth hook: if a supplier skips the pilot run, you become the pilot run.
Sampling timeline benchmark
| Development stage | Typical time | Main risk if skipped |
|---|---|---|
| Data confirmation | 1-3 days | Wrong platform or trim basis |
| Prototype trim/harness build | 7-15 days | Weak first-fit accuracy |
| Vehicle fit and light validation | 3-7 days | Hidden install or hotspot issues |
| Pilot run | 5-10 days | Mass return risk on first order |
| Total realistic sample cycle | 25-35 days | Buyer becomes first real test market |
The fitment variables that create returns
This category has more hidden fitment variables than many buyers expect. The main causes of return include:
– LHD and RHD trim confusion
– sedan vs touring vs long-wheelbase differences
– pre-LCI and LCI trim changes
– factory trim style differences: aluminum, woodgrain, gloss black, M Sport variations
– original ambient light presence changing connector path or installation method
For example, a dashboard trim line may be correct in length and still fail because the clip tower offset is wrong by 1.5 mm. Sounds tiny, right? But on a visible interior trim, that’s enough to create stress whitening, poor seating, or squeak issues.
> Common Mistake
> Buyers often approve samples based only on photos or bench video. We strongly advise approving only after a full in-car installation on the target generation and trim. A bench-lit trim can look perfect and still have a 10-20% practical fit issue rate once installers work on real vehicles.
Fitment approval checklist before PO
1. Confirm exact chassis code
2. Confirm body style
3. Confirm production year range
4. Confirm LHD or RHD
5. Confirm trim finish
6. Confirm whether factory ambient lighting is already present
7. Confirm whether installation is no-cut, low-cut, or modification required
8. Request in-car photos and video on the exact variant
What quality control should a BMW ambient light supplier have?
For B2B programs, we recommend checking whether the supplier has QC steps at four levels:
Incoming material QC
– LED bin and color inspection
– connector pin check
– plastic part dimension check
– tape adhesion lot verification
In-process QC
– solder joint inspection
– harness continuity test
– light output consistency check
– controller pairing/function test
Final QC
– full set power-on test
– color cycle test
– trim appearance inspection under 5000K-6500K white light
– packaging completeness check
Reliability QC
– thermal aging, at least 70°C for 8-24 hours depending on spec
– vibration simulation if possible
– adhesive holding verification
– repeated connector insertion test
In our production, if batch color shift is visible under side-by-side dashboard assembly, we hold shipment even when electrical function is fine. For premium interior products, visual defects trigger more complaints than hard failures.
Comparison: quality checkpoints by supplier level
| Checkpoint | Trading-only vendor | Basic assembly factory | OEM-style specialized factory | What we recommend |
|---|---|---|---|---|
| Vehicle fit validation | Rare | One sample car | Multiple trim checks | Minimum one in-car test per target variant |
| LED color bin control | Low | Medium | High | Ask for batch matching method |
| Burn-in test | 0-1 hr | 1-2 hrs | 2-8 hrs | At least 2 hrs for premium kits |
| Packaging/install docs | Generic | Basic | Model-specific | Required for installer networks |
QC documents to request
- QC standard or inspection checklist
- Fitment list by year/body style
- Burn-in or aging-test record format
- Packaging specification
- Warranty policy and claim process
- Material declaration and compliance statement where applicable
Pricing structure: what drives cost up or down
If you’re building a quote matrix, these are the main cost drivers.
1. Tooling method
– universal parts: low tooling
– CNC/sample trim: high sample cost, low initial speed
– injection mold replacement trim: high upfront tooling, lower long-term unit cost at volume
Typical mold cost for visible trim parts can range from $2,500 to $12,000 per component depending on size, finish, and undercut complexity.
2. Harness complexity
A simple power harness may cost $2-$5.
A multi-door, dashboard, footwell harness with OEM-style connectors can reach $12-$28.
3. Controller architecture
Basic RGB controller is inexpensive.
CAN-linked controller with memory and dimming logic adds cost quickly.
4. Finish matching
If you need exact gloss black, brushed aluminum look, or woodgrain matching, part finishing cost rises. Hydro-dip, painting, UV topcoat, or texture match can add $8-$30/set.
5. Packaging and branding
Private color box, foam tray, barcode labels, multilingual manual, and branded controller app all add cost. Usually $3-$12/set depending on scale.
For most B2B buyers, the practical landed target sits in this range:
– entry retail line: ex-factory $25-$45
– installer-focused line: ex-factory $60-$110
– premium OEM-look line: ex-factory $120-$220
Cost build-up example
| Cost element | Basic kit | Mid-tier kit | Premium trim kit |
|---|---|---|---|
| Lighting components | $6-$12 | $14-$24 | $24-$45 |
| Harness/connectors | $2-$5 | $6-$14 | $12-$28 |
| Trim/diffuser parts | $3-$8 | $15-$28 | $38-$85 |
| Controller | $2-$6 | $8-$16 | $16-$35 |
| Packaging/docs | $1-$4 | $3-$8 | $5-$12 |
| Typical ex-factory range | $18-$42 | $55-$95 | $110-$220 |
MOQ and private label realities
Some buyers ask for low MOQ plus custom mold plus full brand packaging. Usually, that combination doesn’t work economically.
A realistic structure is:
– stock neutral kit: MOQ 20-50 sets
– private label packaging only: MOQ 100-200 sets
– minor harness/controller customization: MOQ 100-300 sets
– private mold vehicle-specific trim development: MOQ 200-500 sets or tooling charge paid separately
If a factory offers custom molded BMW trim with MOQ 20 sets and no tooling fee, be careful. It usually means one of three things:
– they do not actually own the tooling
– they are reusing a generic pattern
– they will recover the cost through unstable later pricing
Fifth hook: the cheapest first order often becomes the most expensive third order.
MOQ decision logic
– If annual volume is below 300 sets, avoid new mold programs unless the margin is unusually high.
– If annual volume is around 500-1,000 sets, semi-specific kits often make more sense than private molds.
– If annual volume is above 1,000-2,000 sets, replacement trim or private-program economics usually improve.
Installation considerations for importer and workshop customers
If your channel includes professional installers, reduce installation pain first. What matters most:
– pre-labeled harness branches
– left/right markings
– trim removal map
– power pickup guidance
– panel clip spare pack
– anti-rattle tape inclusion
– multilingual manual with real vehicle photos
A good kit can save 45-90 minutes of labor compared with a generic one. In many markets, installer labor runs $40-$120/hour. Saving one hour is often worth more than saving $10 on product cost.
That’s why many distributors move away from universal [car led strip light](/) products and toward model-specific [auto ambient lighting](/) or [automotive interior lights](/) packages once they build an installer network.
Installer-focused buying criteria
| Factor | Generic kit | Better installer-grade kit | Why it matters |
|---|---|---|---|
| Harness labels | Minimal | Clear branch labels | Reduces routing mistakes |
| Trim instructions | Generic | Model-specific photos | Lowers install time |
| Spare clips | Rare | Included | Prevents delays and rattles |
| Extra tape/felt | Often missing | Included | Improves final finish |
| Fit consistency | Variable | Higher | Reduces comebacks |
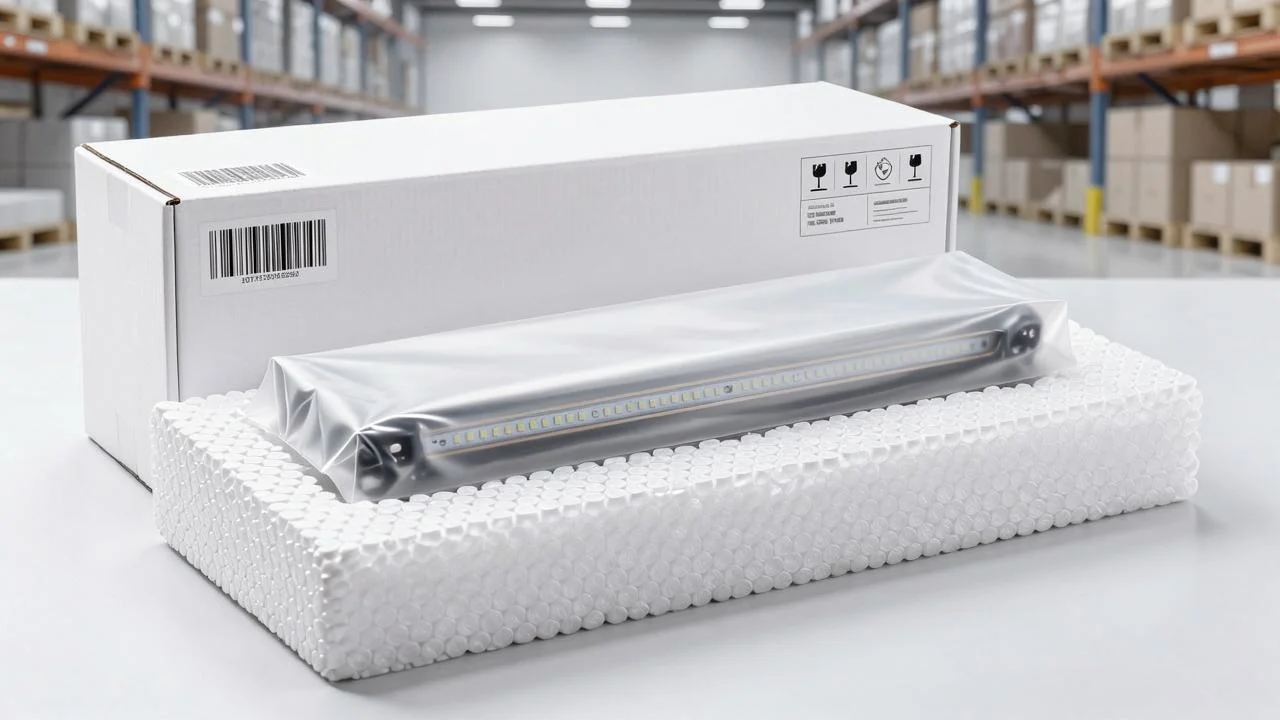
Packaging, damage risk, and return prevention
Interior trim kits are vulnerable to:
– scratch damage on gloss surfaces
– diffuser cracking
– bent pins
– harness abrasion
– missing small accessories
We usually recommend:
– individual protective film on visible trim
– EPE or EVA tray support
– separate bagging for metal clips
– outer carton drop protection
– carton edge crush target suitable for export stacking
For a full BMW trim kit, export carton dimensions are often around 78 x 36 x 14 cm to 92 x 40 x 16 cm, with gross weight 3.5-6.5 kg depending on included trim pieces.
Packaging checkpoint list
1. Protective film on every visible trim surface
2. Diffuser edge protection
3. Connector pin covers or separate secure bagging
4. L/R piece labels visible before unpacking all contents
5. Installation manual packed on top
6. Outer carton compression suitable for export stacking
Compliance and safety considerations buyers should not ignore
A BMW 3 Series ambient light upgrade is not a high-voltage product, but there are still compliance and safety issues to watch:
– RoHS material compliance
– EMC behavior for controllers
– wire insulation quality
– fuse protection
– no interference with side airbags or curtain airbag paths
– heat management around driver boards
We also suggest avoiding exaggerated brightness. Ambient light should stay ambient. If line brightness is too high, customers start complaining about windshield reflection or night-driving distraction.
In our benchmark testing, many satisfactory BMW cabin lines are visually effective at moderate output rather than maximum output. More brightness doesn’t automatically create a better premium feel.
Useful external compliance references
For buyers who need more than a supplier promise, these references are worth reviewing:
– UNECE vehicle regulations for the wider regulatory environment
– RoHS restrictions for hazardous substances in electronic components
– UL reference materials for wiring and component documentation
– SAE resources for connector and automotive-electrical best practices
These references do not replace vehicle testing, but they help procurement teams ask stronger compliance questions.
How to evaluate samples like a sourcing manager
When you receive a sample, don’t just power it on and call it done. We use a short practical checklist:
Visual
– is the line uniform from 0.5 m and 1.0 m?
– are there hotspots at bends?
– does color match across dash and doors?
Mechanical
– do clips seat without excessive force?
– are visible surfaces flush within roughly 0.5-1.0 mm?
– any panel stress marks after install?
Electrical
– stable on engine start?
– any flicker at low dim level?
– color memory after power cycle?
– current draw within supplier spec?
Installation
– total install time
– any unclear routing
– any trim interference
– any extra tape needed beyond kit supply
Packaging
– are all small parts counted?
– are labels clear by model/year?
– can an installer identify left/right immediately?
If possible, test one sample after 24 hours at 70°C and one sample after a cold cycle around -20°C to -10°C. We’ve seen trim clips behave differently after thermal cycling, especially on mixed-material assemblies.
Sample scorecard template
| Category | Pass criteria | Result notes |
|---|---|---|
| Visual uniformity | No obvious hotspot from 0.5-1.0 m | |
| Fit/flushness | Within approx. 0.5-1.0 mm visible tolerance | |
| Electrical stability | No flicker, stable startup, memory retained | |
| Install efficiency | Within planned labor window | |
| Packaging completeness | All accessories and labels correct |
Choosing the right supplier type
Not every buyer needs the same supplier.
Trading company
Good for:
– SKU aggregation
– lower communication burden
– mixed-category sourcing
Risk:
– less control over fit validation
– slower problem solving on technical issues
Assembly factory
Good for:
– basic customization
– decent pricing
– moderate MOQ
Risk:
– some dependence on outside mold/harness suppliers
– variable engineering depth
Specialized interior lighting manufacturer
Good for:
– higher product consistency
– better optical and fitment engineering
– stronger support for private projects
Risk:
– may focus on fewer platforms
– may quote higher initially
For serious [car ambient light](/) programs and branded [car lighting upgrade](/) lines, we usually suggest working directly with a specialized manufacturer if your annual volume is above 1,000-2,000 sets.
Supplier selection matrix
| Supplier type | Best for | Technical depth | MOQ flexibility | Problem-solving speed | Best use case |
|---|---|---|---|---|---|
| Trading company | Mixed sourcing | Low to medium | Medium | Medium to low | Small buyers bundling products |
| Assembly factory | Practical mid-tier programs | Medium | Medium | Medium | Regional distributors |
| Specialized manufacturer | OEM-look programs | High | Medium to low | High | Serious branded BMW line |
Market positioning: budget, mid-tier, premium
A practical way to build your BMW line is to separate it into three levels:
Budget line
– universal or semi-universal
– app or remote control
– basic packaging
– target wholesale market
Mid-tier installer line
– model-specific harness
– shaped light guide
– reliable instructions
– lower warranty risk
Premium OEM-look line
– replacement trim
– close color/finish match
– integrated control strategy
– stronger margin
This lets you cover buyers looking for [car mood lighting](/) and those wanting more technical [automotive led lighting](/) solutions without forcing one product to serve every market.
Sixth hook: when one SKU tries to cover all BMW 3 Series years, trims, and customer types, quality usually drops somewhere.
Recommended lineup strategy for new entrants
- Start with one strong F30/F31 mid-tier kit
- Add one G20 premium kit only after validation
- Do not overload on trim-color variants in the first order
- Use neutral packaging until reorder data is stable
- Track return reasons by fit, color, electronics, and packaging separately
Real questions buyers ask us before placing orders
“Can we match original BMW amber/orange?”
Usually yes, but exact visual match depends on surrounding trim color, diffuser material, and dimming level. We often provide 2-3 LED bin options for approval.
“Can the kit support 64 colors?”
Yes in control logic, but the practical quality question is whether each color remains uniform across all pieces. More colors increase tuning work.
“Can you make it plug and play?”
Sometimes. Full plug-and-play depends on whether we are replacing trim only, how power is taken, and whether factory connectors are available. Some kits are “low-cut installation,” not truly no-cut.
“What warranty rate is acceptable?”
For a mature vehicle-specific program, many buyers target below 1.5-3.0%. Universal kits often run higher, especially if sold to DIY channels.
“How long does private development take?”
A realistic first project is often 30-60 days for sample and validation, longer if new molds are needed.
Buyer decision path: how to choose the right BMW 3 Series ambient light upgrade
Many articles stop at product description. That’s not enough for procurement. Here is the practical decision path we recommend.
Step 1: Define your sales channel
– DIY online retail: prioritize cost, packaging clarity, and app control
– Installer network: prioritize fitment, labor time, and parts completeness
– Premium branded distribution: prioritize replacement trim quality, finish match, and low return rate
Step 2: Define your target BMW generation
– Start with F30/F31 for volume and easier commercialization
– Add G20/G28 for margin once validation capability is ready
– Treat E90 as an opportunistic price-led line, not your main technical showcase
Step 3: Choose the right product architecture
– If budget is tight and return tolerance is high: universal
– If labor cost matters and customers want a better look: semi-vehicle-specific
– If your brand promise is OEM style: replacement trim integrated
Step 4: Compare total delivered value, not only unit cost
Use this formula mentally:
Total value = unit price + install labor + expected return cost + support burden + reorder stability
A cheaper kit can be more expensive if:
– install time is 1 hour longer
– return rate is 2-4% higher
– photos create wrong fitment expectations
– the second order changes spec without notice
Step 5: Approve only after in-car validation
Do not approve from catalog photos alone. Require:
– real in-car installation photos
– bench and installed night video
– fitment list
– packaging confirmation
– sample thermal test feedback
Step 6: Start with a limited SKU rollout
A safer launch is:
– 1-2 generations
– 1-2 control options
– neutral packaging first
– reorder after field feedback
Quick recommendations by buyer profile
| Buyer profile | Best first product | Suggested ex-factory range | Main reason |
|---|---|---|---|
| Online retailer | Universal or low-cost semi-specific | $25-$45 | Price and broad compatibility |
| Regional installer distributor | Semi-vehicle-specific | $60-$110 | Better labor efficiency and lower complaint risk |
| Premium importer/brand | Replacement trim integrated | $120-$220 | Stronger OEM look and premium margin |
| High-volume private label buyer | Private-program trim kit | $160-$280 | Better brand differentiation at scale |
FAQ
What is the best type of BMW 3 Series ambient light upgrade for B2B importers?
For most importers, the best balance is a semi-vehicle-specific or replacement trim integrated kit. Universal kits are cheaper at $18-$42, but installer complaints and appearance issues are higher. Replacement trim kits at $110-$220 have better perceived value and lower installation variability.
Which BMW 3 Series generation is easiest to commercialize?
In our experience, F30/F31 is the easiest starting point. Demand is strong, the visual improvement is obvious, and aftermarket familiarity is good. G20 has strong premium potential, but expectations on fit and integration are much stricter.
How can we judge whether a supplier’s “OEM quality” claim is real?
Ask for specifics: material grades, LED bin control, in-car fit test photos, burn-in duration, trim tolerance, and actual MOQ for private projects. If the supplier can’t tell you whether the diffuser is PMMA or PC, or whether burn-in is 2 hours or 8 hours, they probably aren’t controlling production deeply.
What is a normal MOQ for BMW 3 Series ambient light upgrade kits?
For stock kits, 20-50 sets is reasonable. For private label packaging, 100-200 sets is common. For new mold development, expect 200-500 sets or a separate tooling charge.
Are app-controlled kits good enough for premium markets?
Sometimes yes. App control is acceptable if light uniformity, material finish, and installation quality are strong. Many end users care more about the visual result than the control method. But if your market expects factory-menu behavior, app-only control may feel aftermarket.
What are the main failure points after installation?
The most common issues we see are:
– adhesive lifting in hot cabins
– visible hotspots
– color mismatch between pieces
– poor clip alignment
– harness noise or loose routing
– controller instability on startup
Can ambient light upgrades interfere with vehicle electronics?
They can if electrical design is poor. A proper kit should be designed for 9-16V automotive input, include basic protection, and be tested for stable startup behavior. Integration claims should be validated on the exact BMW platform.
What documents should we request before bulk order?
At minimum:
– fitment list by year/model/body style
– installation manual
– packing list
– QC standard
– warranty policy
– carton dimensions and weights
– compliance statement for materials/electrical parts where applicable
External benchmarks and authority references
When discussing vehicle compatibility, service architecture, and material/compliance expectations, we recommend reviewing authoritative vehicle and technical references instead of relying only on seller listings. Useful sources include BMW model information and recognized automotive standards organizations such as SAE and UNECE. These don’t replace supplier validation, but they do help buyers ask better questions.
For broader category positioning, buyers comparing BMW-specific kits with general [interior car lights](/), [car interior led](/), or [car tuning parts](/) programs should keep in mind that vehicle-specific trim products always involve deeper engineering than generic lighting accessories.
Beyond those baseline references, buyers should also review:
– BMW owner and model pages for generation verification and trim context
– BMW Group annual reports for model-line scale and lifecycle relevance
– 3M automotive tape technical documentation for adhesive claims
– SABIC/Covestro polymer data for PC, PMMA, and PC-ABS property validation
– UL Solutions for materials and wiring documentation context
Seventh hook: if your return reason says “not fit,” that’s rarely a sales problem. It’s usually a data problem.
Our sourcing recommendation for most B2B buyers
If we were building a new BMW 3 Series line for a distributor today, we’d do this:
1. Start with F30/F31 and one G20 premium SKU
2. Offer two tiers, not five:
– installer mid-tier at $65-$95 ex-factory
– premium trim-integrated at $125-$185 ex-factory
3. Keep control options simple:
– app/RGB for mid-tier
– CAN-linked or memory-sync option for premium
4. Require:
– in-car validation
– 2-8 hour burn-in
– model/year fitment label
– spare clips and anti-rattle materials
5. Launch neutral packaging first, then private label after reorder stability
This keeps inventory risk lower while still protecting margin and quality.
Clear recommendation by scenario
| Scenario | Best choice | Why |
|---|---|---|
| First-time BMW importer | F30/F31 semi-specific kit | Lower risk, broad demand, manageable install complexity |
| Established installer distributor | F30/F31 + G20 two-tier program | Covers volume and premium margin |
| Premium private-label brand | Replacement trim integrated, limited validated SKUs | Stronger differentiation and lower perceived aftermarket feel |
| Low-budget online seller | Universal kit only if return expectations are controlled | Cheapest entry, but weakest long-term brand effect |
Final thoughts
The BMW 3 Series ambient light upgrade market looks simple from the outside because the product is decorative. In production, though, it’s a mix of optics, plastics, wiring, trim tolerance, and installation engineering. That’s why two products that look similar online can behave very differently in the field.
Our honest view? If your channel is pure low-price online retail, a universal kit may be enough. If your channel includes installers, dealers, or a branded premium catalog, spend more on fitment, materials, and instructions. The drop in complaints usually pays for itself pretty quickly.
Eighth hook: ambient light is sold by color, but won by fit.
If you’re planning a BMW 3 Series line and want practical advice on structure, MOQ, target pricing, or whether a replacement-trim program makes sense for your market, request a quote with your target generation, trim level, annual volume, and control requirement. We can usually tell within one review whether you should choose a universal, semi-specific, or OEM-style trim-integrated route.
– bmw
– bmw car lighting
– bmw led interior light
References & Sources
1. BMW 3 Series Sedan overview | BMW.com
2. SAE International
3. UNECE Vehicle Regulations
4. BMW Group Reports
5. 3M Automotive Attachment Tapes
6. SABIC LNP and engineering thermoplastics
7. Covestro polycarbonate materials
8. UL Solutions
9. European Commission RoHS overview
 Audi
Audi BMW
BMW Mercedes Benz
 BYD
BYD Ford
Ford Geely/ZEEKR
 Honda
Honda Hyundai Kia
 Jaguar
 Jetour
 Lamborghini
 Land Rover
 Lexus
Lexus Li Auto
 Mazda
Mazda Nissan
 Porsche
 Tesla
Tesla Toyota
 Volkswagen
 Volvo
Volvo