This installation guide will show you how to install Audi A6 C8 2019+ OEM fit ambient light, upgrade the car with 32 colors ambient light.
Product link: OEM Design Multi Colors Ambient Light, Foot Light, Seat Back Light for Audi A6 C8 2019+
- Standard: A6 ambient light (upper dashboard lght, lower dasboard light, front/rear foot light, lowr contour light + handle + storage box light + saddle light), total 26pcs light source(upper dashboard light 3pcs, lower dashboard light 3pcs, front/rea foot light 4pcs, door lower contour light 4pcs, handle 4pcs, storage box light 4pcs, saddle light 4pcs)
- Optional: door upper contour light 8pcs
- Note: Lower dashboard light only equip with light source, don’t equip with light strip, oly can fit for car with original lower light strip
Door light installation
1, ① up contour light cable connect to module port 1, ②lower contour light, handle light, storage box light cable connects to module port 2
2, pry out speaker cover

3, Open decoration board
4, Remove 3pcs screws then take out door panel

5, Remove handle screws, take out handle parts
6, Remove the glue and screws that fixing the up contour panel

7, Remove whole row glue and screws that fixing the contour parts of rear door
8, Take out up contour decoration parts

9, Replace orignial parts with our parts with light strip
10, Remove lower contour parts screws then pry it out

11, Take out the decoration part
12, Install product light strip

13, Replace original handle light with product handle light
14, Use the screwdriver come with the product to make hole on storage box correct position and install the storage box light

15, Take out the door socket, take out the socket inside and convert to our socket
16, Door module socket definition

Saddle Light Installation
1, Pry out gear cover
2, Remove screws on cup holder and gear

3, Remove saddle decoration parts and remove the screws
4, Saddle light led diodes pull to this position
5, Install product decoration strip, and plug the led diodes


Low dashboard light and foot light installation
1, Plug the led diodes to driver side light strip (left side)
2, Plug the led diodes to driver side light strip (right side)

3, Plug the led diodes to passenger seat side storage box light strip
4, Product foot light install to original foot position

Up dashboard light installation
1, Remove cluster decoration parts
2, Upper dashboard light strip put inside and plug the led diodes

3, Passenger seat light strip don’t make it too curved, otherwise will not bright enough
4, Driver side light strip put inside original gap and plug the led diode

CAN & Power cable connection
1, Remove passenger seat storage box, take out original grey 12pin socket, convert to product CAN cable
2, GND connect to car body screw, power cable connects to driver side fuse box BATT position

Control box port definition

Ambient Light Setting Instruction
1, Click Vechle – Lighting & Visibility
2, Interior lighting
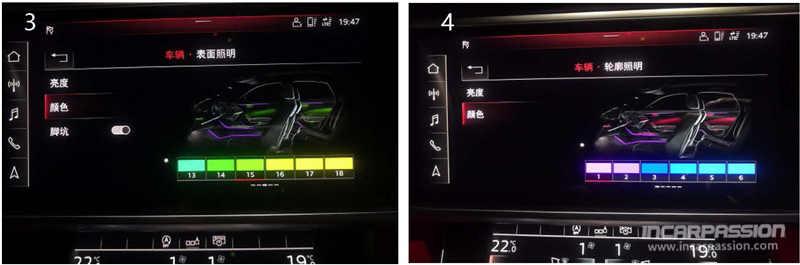
3, Surface lighting
4, Contour lighting

“Breathing” mode setting
Breathing mode: choose the last color #30 white color in both Surface lighting and contour lighting, after 40 seconds, the light color will change automatically

Test & Restore
- Turn on car, check if all light source works, if all light source not work, check if the power cable connected correctly
- If light strip is not bright enough, check if the led diode is plug to correct position
- After check, restore all the parts
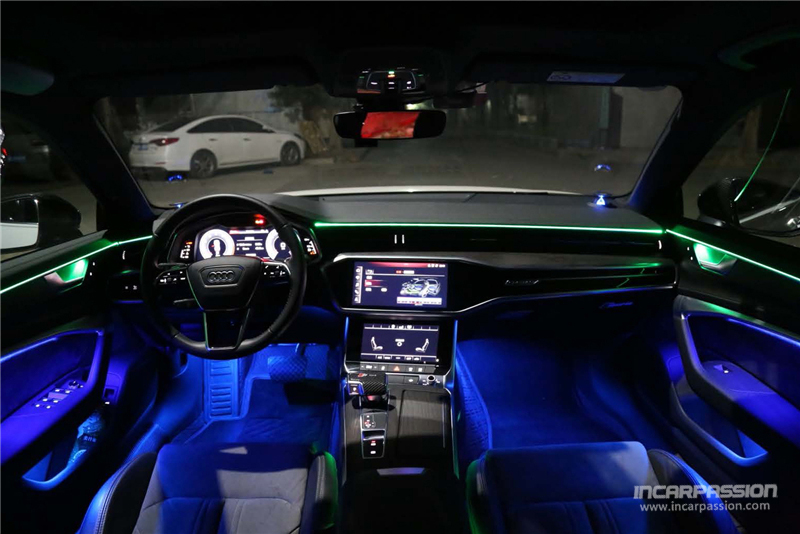
After install


 Audi
Audi BMW
BMW Mercedes Benz
 BYD
BYD BAIC MOTOR
 Denza
Denza Ford
Ford Geely/ZEEKR
 Honda
Honda Hyundai Kia
 Jaguar
 Jetour
 Jeep
Jeep Lamborghini
 Land Rover
 Lexus
Lexus Li Auto
 Mazda
Mazda Nissan
 Porsche
 Tesla
Tesla Toyota
 Volkswagen
 Volvo
Volvo